A Crash Course in Kubernetes #2: Nodes
Hello and welcome to our now slightly less-new blog post series, “A Crash Course on Kubernetes!”
Our summer intern didn’t have a background in Kubernetes, so to get her up to speed, we started giving internal Tilt University presentations on relevant concepts. This was a great crash course for our intern, but even our experienced engineers learned things at these talks–turns out, you can work within Kubernetes pretty effectively and still have large gaps in your mental models.
We’re blogifying our Tilt U presentations so that other folks can benefit from the digging we did. This is post #2 of the series, in which we talk about nodes, a.k.a “the things that hold the things that run your app.”
If you missed Post 1: Overview, you might want to start there. Stay tuned for post #3, which will cover pods (the things that actually run your app) and services (how pods talk to each other and the outside world).
What is a Node, and Why Should I Care?
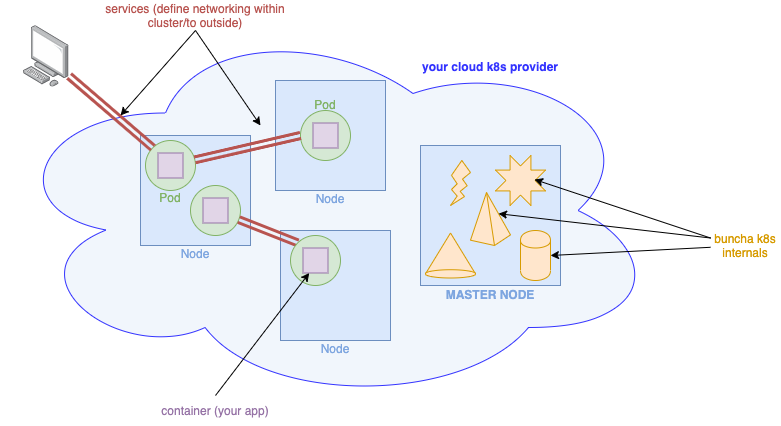
 An extremely high-level, hand-wave-y architecture diagram.
In the above diagram, the blue squares are nodes. A node is just a machine (physical or virtual, it doesn’t matter) that runs some containers, and a Kubernetes process or two. There are two types of nodes: worker nodes, where your code runs, and the master node, which is in charge of managing the cluster.1
While it’s tempting to skip straight to a discussion of pods—i.e. running units of your app—it’s prudent start with nodes because after all, the interesting part of Kubernetes (IMO) isn’t that it runs a bunch of containers for you, it’s how. That “how” is nodes: the machinery that controls your cluster (the master node), and the machinery that runs your pods (worker nodes).
Like most other parts of Kubernetes, nodes are easy to ignore and abstract away when your cluster is in a happy state. (After all, the point of Kubernetes is to abstract away individual machines!) When things start to break, however, it can be really useful to understand just what Kubernetes is doing; if you start getting errors like “node(s) had taints” and “could not schedule pod”, knowing how nodes work, and how pods are assigned to nodes, will help you figure out what’s going on.
More importantly, as your mental model of Kubernetes gets more detailed, it helps to understand just
how Kubernetes stores and enforces your desired state, and how your kubectl commands interact with
the cluster. Simply put, the master node controls your whole cluster, so if you want to understand
Kubernetes, that’s a great place to start!
Wait, What’s a Pod?
Simply put, a pod is one unit of your app—say, a running instance of shopping_cart_server.
There’s a bit more to it than that, of course, but we’ll delve into the intricacies of pods in
the next post in this series.
For the discussion of nodes, all you need to know is that a pod runs your app in a container, and pods themselves are containers that run on nodes.
Anatomy of a Node
Master Node
First we’ll talk about the master node. It’s called the “master node” because it’s in charge of everything.
In Kubernetes, you specify your configuration declaratively—you tell Kubernetes the desired state of your cluster (number of instances of your app, which scaling method to use, how to set up the networking) and Kubernetes makes it so.
The master node contains both the means for specifying your desired state, and the machinery for achieving and maintaining that state. Some bits of the master node that you should know about:
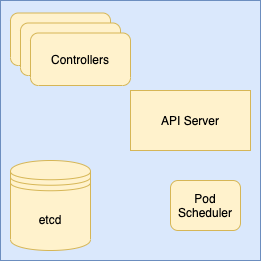
 A(n incomplete) diagram of the master node’s machinery
etcd: data storage
The desired cluster state lives on the master node in a datastore called etcd, a consistent, highly available key-value store.
API Server: interacting with the cluster
The API server is the means by which the master node (and the user) makes changes to the cluster—it provides endpoints for creating, configuring, and deleting just about anything in the cluster.
Pod Scheduler: assign pods to worker nodes
The pod scheduler watches for new pods that haven’t been assigned to nodes. These are pods that need creation, but we don’t yet know what node they’re going to live on. For each of these pods, the pod scheduler finds the “best” node to put it on, according to a set of rules which Kubernetes calls “priorities.” (Some set of scheduling priorities are active by default, but you can configure your cluster to use whatever priorities you want.)
Some examples examples of priorities include: “try to put this pod on a node that already has the relevant container images cached locally,” or “try to put this pod on the node that’s currently using the least resources.”
Controllers: maintain desired cluster state
The master node runs a number of controllers. For a given type of Kubernetes object, a controller:
- Polls the cluster for state relating to that type;
- Compares it to the desired state stored in etcd; and if needed,
- Calls out to the API server to make any changes to the cluster.
For example, if the Replication Controller sees that the desired state of ReplicaSet A is “four copies of podA”, but only three podA’s exist in the cluster, the controller asks the API server to spin up another podA.
The API server is the bit of master node machinery that makes changes in the cluster. K8s
internals call to the API server to create, update, and destroy objects, store data in etcd,
and a bunch of other stuff. The API server also accepts user commands–any kubectl command
you run is a request to the API server.
So when you call kubectl apply -f pod.yaml, what’s going on under the hood looks sooomething like this:
To read more about the above components, and all the other bits and pieces on the master node that do important work, see the Kubernetes docs.
Worker Node(s)
All the fine-grained control of the master node does no good if there’s nowhere for your apps to run. That’s where worker nodes come in. Worker nodes are machines that run one or more pods (i.e. units of your app).
If you’re connected to a Kubernetes cluster in the cloud, you’ll most likely run your pods across multiple nodes. If you’re running Kubernetes locally (e.g. Docker Desktop, KinD, Minikube), you’ll be working with a single node, which is a VM or container running on your computer. Regardless of the number of worker nodes you have at your disposal, and whether they’re physical or virtual machines, the basic anatomy is the same.
In addition to your pod(s), a worker node has some additional daemons that allow it to do its job:
- Kubelet: makes sure that the right containers are running on the right pods. It works a lot like the controllers that live on the master node: the kubelet reads the state of all the pods on its node, compares that against the desired state and, if there’s a discrepancy, makes the necessary changes
- Kube-proxy: proxies network traffic to/from pods (since pods aren’t themselves directly connected to the network)
Read more about worker nodes and their components here.
That’s it for now
Thanks for joining us for post #2 of our “Crash Course on Kubernetes.” I hope this overview of nodes answered at least some of your questions (even if it left you with many more).
Our next post in this series will focus on pods—you know, the bits of Kubernetes that actually run your app—how they work, and how they talk to each other and the outside world.
Until then: happy kube-ing!
-
to complicate things further, some Kubernetes runtimes are single-node clusters, in which a single node (a container or VM) serves as both the master node and the worker node. However, you can still think of these as separate types of nodes that just happen to be co-located; they still do very different things, even if they live on the same machine. ↩


